The campaign against the invading Russian forces is going well. Their air force is heavily depleted and we have the advantage in ground force numbers. They however still have the upper hand in air defences.
Part of your mission this evening is to go some way to rectify that as well as hitting their power production and supplies.
Beast 3 - SEAD Warhawk 3 - Deep Strike
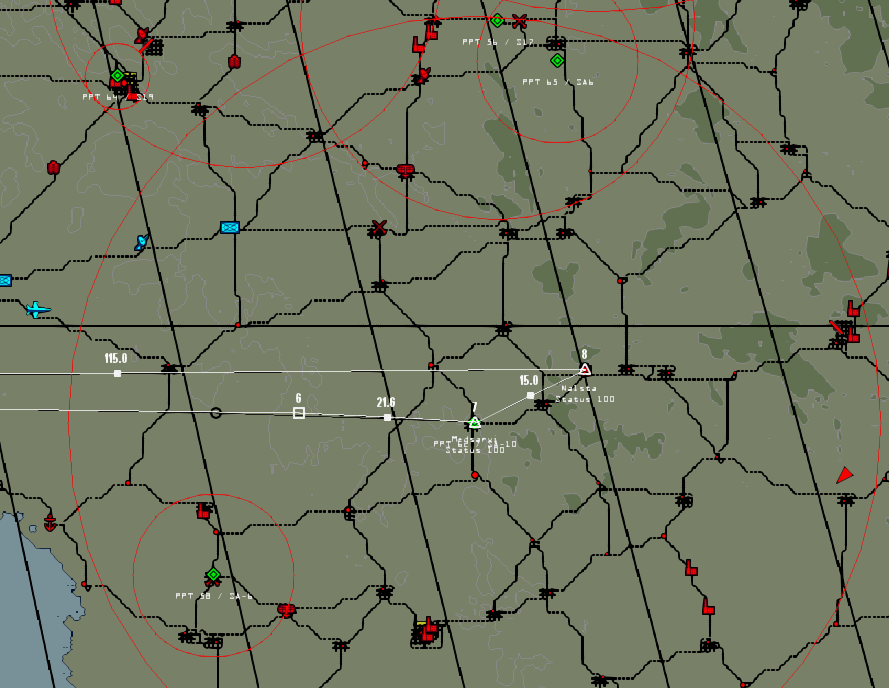
The above image shows the location of the deep strike targets. The primary target is Medsarvi nuclear power station and the reactor must be destroyed. The secondary target is Nalsta supply depot where we need the depot complex destroying. Both these kills are required for a mission success with a partial given for the destruction of the Medsarvi reactor.
At Medsarvi there are two SA-10 battalions in the same location. These are the 51st and 52nd ADB and both are at full strength.
Most of the area around the strike targets appears to be clear but note that an SA-17 battalion is north of track by the FLOT and similarly there is an SA-6 battalion south of track. These are not expected to be a factor but should be monitored by the SEAD flight. Mission success is for both Flap Lids to be destroyed and no losses to the strike flight from radar SAMs. One loss is permitted for a partial success.
Further east from the target area is Kuusamo air base, which is fully operational. It's aircraft numbers are severely depleted with only 2 x Su-35s and 4 x Su-34s on compliment. They have lost all their Su-30MKKs. Keep an eye on aircraft from there in case the 35's get airborne against you.
Plan: Destroy SA-10 over target and monitor any pop up SAMs Sanitize airspace for WARHAWK3
Execution: Picked up several groups from the SE, we commited on them although being already engaged by friendlies, #3 and #4 managed to get some kills. We dropped our SDBs on the SA-10 + 1 Magnum and destroyed the launchers and radars. #2 thought he had been launched at by either SA-10 or bandits and went defensive, checking at the tape it was the meteor missiles fired by friendlies. This confusion led him to fire a HARM towards friendlies which unfortunately locked onto a blue radar.
WARHAWK3 was cleared in and we set up CAP. #1 and #2 picked up a couple of SU-30 probably on their way home and monitored, they turned hot as we were turning cold so we handed over to #3 and #4 who took care of them. They fired their remaining HARMS at search radars. Several SA-6 and 1 SA-8 popped up. #1 and #2 now JOKER, WARHAWK3 with just a few mins to go we started our way back home. #3 got a helo kill on the way back then we rejoined for an overhead break. #2 went blind but managed to catch up. #WARHAWK3 coming in for the overhead and #1 turning to final slightly too high #3 called for traffic conflict I decided to go around as soon as I caught WARHAWK3 visual.
Plan Standoff attack on power plant from #1 and #2 and Depot by #3. GBU 31 2000lb HE JDAMS.
Execution Slow ingress holding while Escort dealt with air threats. Cleared onto target, #1 and #2 dropped onto power plant and destroyed it. #3 had to take a couple of passes due to release issues, also destroying target.
RTB and overhead break onto R19.
Discussed a couple of deconfliction points between the flights during debrief to ensure we avoid potential mid-airs in congested airspace.