| Author |
 Topic Topic  |
|
|
Griffin

UNITED KINGDOM
5052 Posts
Status: offline |
 Posted - 21 Jan 2024 : 22:06:45 Posted - 21 Jan 2024 : 22:06:45


|
The 185th has worked well against serious opposition to reduce not only the number of air defence assets that the enemy has covering their offence, but also continues to reduce the enemy air assets at a Favourable rate.
The next mission is to remove one source of the air threats by destroying the runway at Pohang, which is home to Su-35s. By removing this threat we can concentrate further on the southern threats and allow our troops to perhaps advance.
The air base is protected by SA-3 and SA-15 battalions north of the air base and an Sa-10 far to the south.
Your task is destroy runway 10/28 at Pohang.
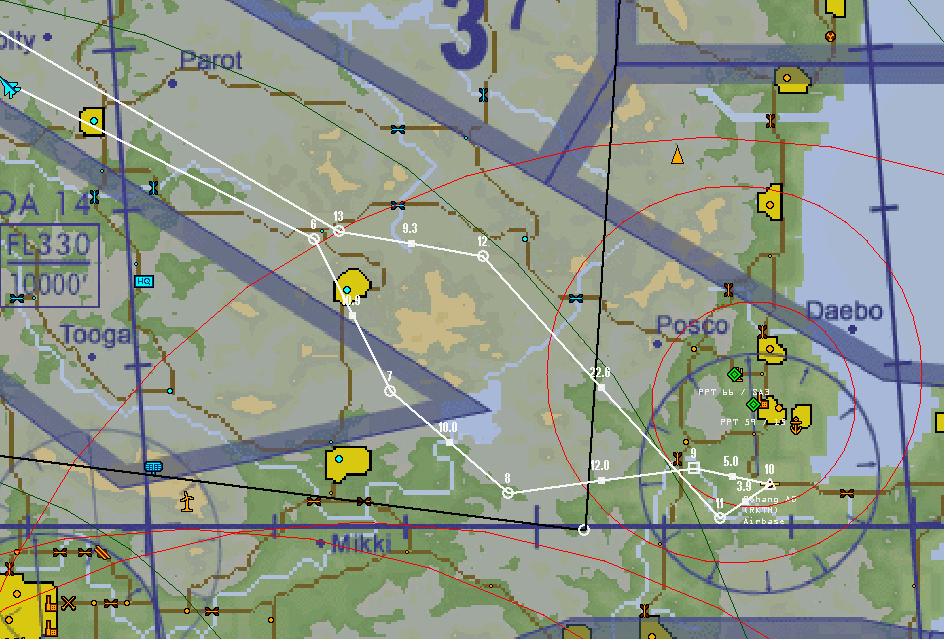
Fig. 1 - OCA Flight Plan Over the Target Area with Suggested Low Level Route to Target
The above image shows the OCA (Bulldog 2) flight plan around the target. It is suggested that this route or similar be taken at low level to make use of the ground cover to screen against SAMs and to stay under the predicted low cloud ceiling of 1000 feet at the target. It will also keep you out of the SA-3 and Sa-15 threat circles for longer.
It shall be Weasel 2's job to shut down the SA-3 battalion and attack the SA-15 battalion. The recorded PPTs are very accurate.
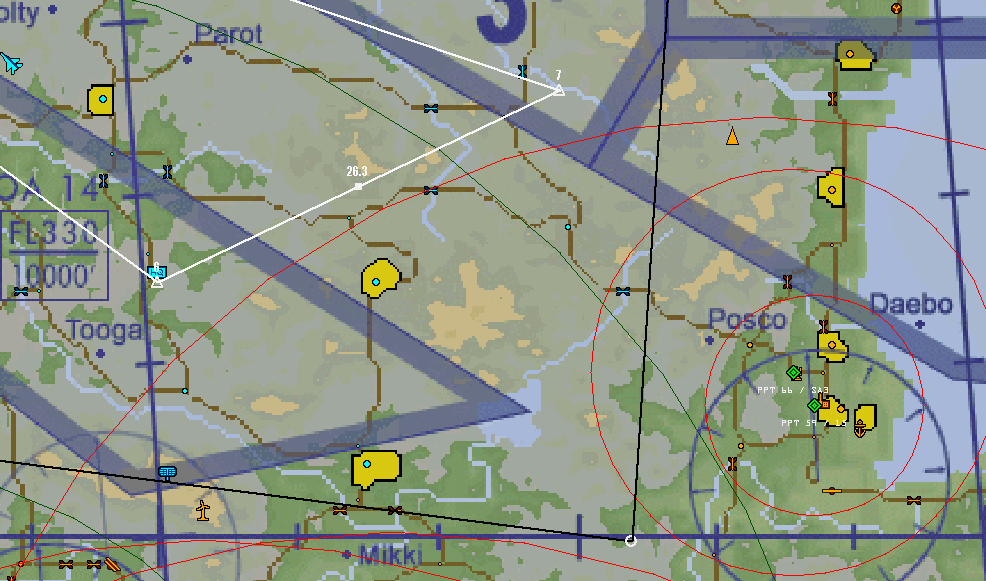
Fig. 2 - Escort Flight Plan at the Target Area
The F-15C contingent, Rumble 3, shall provide air cover on the edge of the SA-10 circle, paying particular attention to the risk from scrambling aircraft from Pohang as well as the know threats from the south.
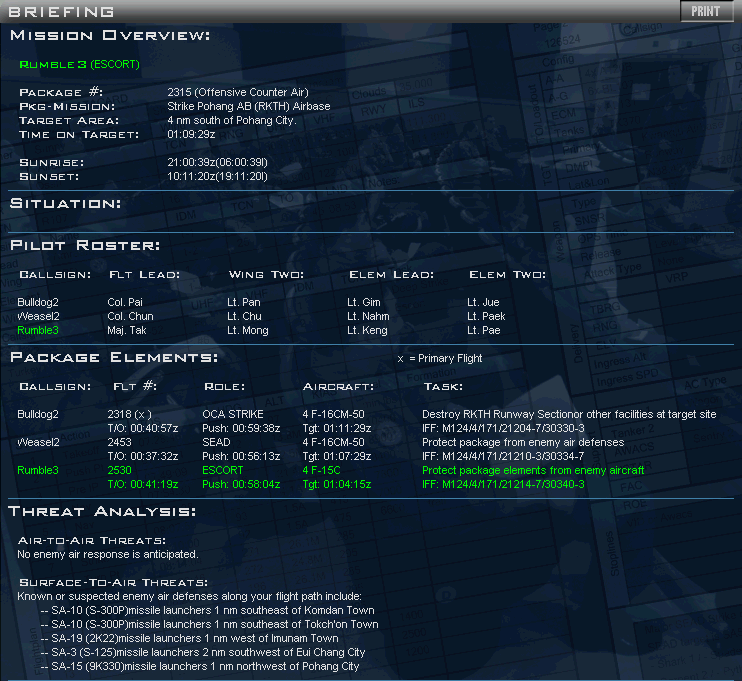
Fig. 3 & 4 - Mission Briefing for Package 2315
Note that the weather is continuing to deteriorate and the cloud base at the target is extremely low (1000 feet).
Your loadout is at flight leads discretion.
Mission Success Criteria
Package success will be the destruction of the Pohang runway, the SA-3 Low Blow and no F-16 losses to air threats.
Partial Success shall be awarded for the destruction of the runway at Pohang only. A maximum of one F-16 loss is permitted.
Good Hunting.
Results
Flight Leads in this Sunday's official mission, "Bear Trap 10" are requested to post a debrief of their flight's actions, including any lessons learned or that should be learned by others.
Please put the following information at the top of your post:
Flight Role: (SEAD, ESCORT, STRIKE, Etc..)
Callsign11: "Pilot's name" AA=X AG=X RTB,MIA/KIA,EJT
Callsign12: "Pilot's name" AA=X AG=X RTB,MIA/KIA,EJT
Callsign13: "Pilot's name" AA=X AG=X RTB,MIA/KIA,EJT
Callsign14: "Pilot's name" AA=X AG=X RTB,MIA/KIA,EJT
MS/PS/MF
|
|
|
Pegasus

UNITED KINGDOM
288 Posts
Status: offline |
Posted - 29 Jan 2024 : 11:21:50

|
Flight Role: SEAD
Weasel 21: "Pilot's name" AA=0 AG=4 KIA
Weasel 22: "Pilot's name" AA=0 AG=1 KIA
MS
Flight went in low level to avoid SA-10 attention, which in hindsight was too much of a risk. We could have achieved the mission by positioning to the North of the SA-10 threat circle and attacking southwards.
We were spotted by some Su-33s on ingress, but Rumble kept them occupied.
I was 10nm ahead of Mango, with a mixed load of CBU-103s (CEM WCMD) for the SA-3 and a single HARM for the SA-15s, and Mango had 2x HARMS for the SA-15s.
I tossed my CBU-103s at the Low Blow and SA-3 launchers, getting a kill on the Low Blow and 2 SA-3 launchers and a truck. On egress, I had an "A" launch warning, which turned out to be SA-19s, two missiles missed.
Mango launched his first HARM and got an SA-15 kill. It was a bit too early Bulldog 2 was running late due to the Su-33 attention. Mango and I reset to coordinate with Bulldog 2's arrival to the SA-15 threat circle.
I took the next HARM shot but it did not track. There were no SA-15 launches at Bulldog 2 so I assume they were switched off.
There was one SA-15 launch in between my HARM and Mango's 2nd HARM, but it was evaded by Bulldog 2.
Despite Bulldog 2 needing to linger around the target area (runway obscured by fog), there were no losses to SAMs so Weasel 2's mission was a success.
However, just after my HARM launch, an SA-19 got me, and Mango suffered the same fate after his 2nd HARM launch.
There was a massive group of enemy ground forces (infantry, tanks, SA-19s) just beyond the ridge line we were using to screen our attack, and we exposed ourselves just enough to be shot down.
 |
 |
|
|
Griffin
UNITED KINGDOM
5052 Posts
Status: offline |
Posted - 02 Feb 2024 : 17:38:22
|
Flight Role: OCA STRIKE
Bulldog21: "Griffin" AA=0 AG=3 RTB
Bulldog22: "Gekko" AA=0 AG=0 RTB
MS
Took off and followed the rest of the flight to the target area. The escort dealt with some bandits and a set of leakers threatened us but our slammers and some help from AI aircraft put paid to them.
At the edge of the SA-10 we went NOE and soon found that the target area was swathed in fog, obscuring the target for a CCIP attack. We found the target using FCR and after a few circuits, avoiding small arms fire and SA-15's I managed to drop my bombs, putting paid to the runway. Gekko had trouble releasing the weapons so left me to it. So I was the one who got shot!  I was still flying and with Gekkos assistance (I had no mfds) We made it back to the alternate air base. I was still flying and with Gekkos assistance (I had no mfds) We made it back to the alternate air base.
A fun mission with the RL weather making life interesting.
|
|
|
| |
Topic |
|
|
|
| 185th VFS |
© 2000-2018 185th VFS |
|
|
|